Ponytail, Caveman 후기
요새 유행하는 Ponytail, Caveman 3달 사용 후기
개요
회사에서 보면 AI 잘 활용하는 사람들은 맨날 토큰 사용량 피크치고, 부족해서 개인 구독까지 해서 쓰더라.
나도 이 업계 흐름에 따라가고자, 일할 때에는 최대한 AI를 많이 써보려고 노력은 하는 중이다.
뭘 알아야 잘 쓰겠다 싶어서, 트렌드를 찾아보는데 Ponytail과 Caveman이라는 플러그인이 핫하다고 하더라.
AI를 어떻게 정량적으로 평가할지는 잘 모르겠고.. 그냥 내가 느낀 점을 주관적으로 정리해보았다.
테스트 환경
- AI Tool: Codex
- Model: gpt-5.6-terra
- Reasoning level: Medium
Ponytail

소개
AI를 쓰다보면 지시한적 없는 기능이나, 해당 스콥에서는 의미 없는 방어 코드를 막 만들어주곤 한다.
나는 커밋하기 직전에 이런 부분들을 직접 체크하곤 하는데, 그 과정에 시간이 꽤 들어가곤 한다.
이걸 해결하기 위해 나온 플러그인이 Ponytail이다.
You know him. Long ponytail. Oval glasses. Has been at the company longer than the version control. You show him fifty lines; he looks at them, says nothing, and replaces them with one.
Ponytail puts him inside your AI agent.
어떻게 동작하는가?
Skill 동작
1. Does this need to exist?   → no: skip it (YAGNI)
2. Already in this codebase?  → reuse it, don't rewrite
3. Stdlib does it?            → use it
4. Native platform feature?   → use it
5. Installed dependency?      → use it
6. One line?                  → one line
7. Only then: the minimum that works
Ponytail은 AI가 코드를 작성할 때, 소스를 짧게 짤 수 있도록 여러 단계를 검증한다.
- 필요한 기능인가?
- 이미 코드 베이스에 있는 기능인가?
- 표준 라이브러리가 있는가?
- 플랫폼 기능 (HTML, AOS 등)에 이미 있는 기능인가?
- 이미 설치된 의존성으로 쓸 수 있는가?
- 한 줄의 소스로 가능한가?
- 그 외에는 최소한의 코드로 구현
위 단계를 거치고 나면, 쓸데없는 코드 생성이 없어진다.
강도 조절 모드
/ponytail [lite | full | ultra | off]
테스트1 (Full vs Off)
내 블로그 헤더에 직접 기능을 추가시키도록 지시하였다. 지시 프롬프트는 아래와 같다.
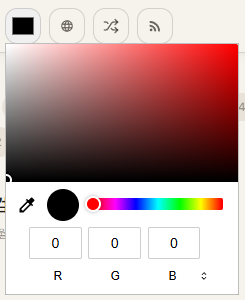
Prompt: color-accent 조정하는 ColorPicker 컴포넌트 만들고 상단 Nav에 추가해줘
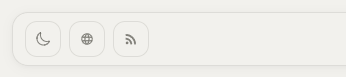
Full
소스 코드 보기
"use client"

export function ColorPicker() {
  return (
    <input
      type="color"
      defaultValue="#e64900"
      aria-label="Choose accent color"
      className="w-9 h-9 p-1 rounded-xl cursor-pointer transition-all duration-150 hover:bg-[var(--color-bg-2)] active:scale-95"
      style={{ border: "1px solid var(--color-border)" }}
      onChange={(event) =>
        document.documentElement.style.setProperty(
          "--color-accent",
          event.target.value,
        )
      }
    />
  )
}
Off
소스 코드 보기
"use client"

import { Popover, PopoverButton, PopoverPanel } from "@headlessui/react"
import { useEffect, useState } from "react"
import PaletteIcon from "@/assets/svg/palette.svg"

const STORAGE_KEY = "accent-color"
const DEFAULT_COLOR = "#e64900"
const COLORS = ["#e64900", "#d9480f", "#e03131", "#c2255c", "#9c36b5", "#5f3dc4", "#4263eb", "#1971c2", "#0b7285", "#087f5b"]

function withAlpha(hex: string, alpha: number) {
  const value = hex.replace("#", "")
  const red = Number.parseInt(value.slice(0, 2), 16)
  const green = Number.parseInt(value.slice(2, 4), 16)
  const blue = Number.parseInt(value.slice(4, 6), 16)

  return `rgba(${red}, ${green}, ${blue}, ${alpha})`
}

function applyColor(color: string) {
  document.documentElement.style.setProperty("--color-accent", color)
  document.documentElement.style.setProperty("--color-accent-muted", withAlpha(color, 0.5))
  document.documentElement.style.setProperty("--color-accent-border", withAlpha(color, 0.4))
}

export function ColorPicker() {
  const [color, setColor] = useState(DEFAULT_COLOR)

  useEffect(() => {
    const savedColor = window.localStorage.getItem(STORAGE_KEY)
    if (savedColor) {
      setColor(savedColor)
      applyColor(savedColor)
    }
  }, [])

  const selectColor = (nextColor: string) => {
    setColor(nextColor)
    applyColor(nextColor)
    window.localStorage.setItem(STORAGE_KEY, nextColor)
  }

  return (
    <Popover className="relative">
      <PopoverButton
        className="w-9 h-9 flex items-center justify-center rounded-xl transition-all duration-150 hover:bg-[var(--color-bg-2)] active:scale-95 outline-none"
        style={{ border: "1px solid var(--color-border)", color: "var(--color-text-2)" }}
        aria-label="Choose accent color"
        title="Choose accent color"
      >
        <PaletteIcon className="w-4 h-4" />
      </PopoverButton>

      <PopoverPanel
        anchor="bottom start"
        className="w-52 p-3 rounded-xl z-50 !mt-1"
        style={{
          border: "1px solid var(--color-border)",
          background: "var(--color-bg)",
          boxShadow: "rgba(0,0,0,0.12) 0px 16px 48px, rgba(0,0,0,0.06) 0px 4px 16px",
        }}
      >
        <p className="mb-2 text-xs font-semibold" style={{ color: "var(--color-text-2)" }}>
          Accent color
        </p>
        <div className="grid grid-cols-5 gap-2">
          {COLORS.map((swatch) => (
            <button
              key={swatch}
              type="button"
              onClick={() => selectColor(swatch)}
              className="w-7 h-7 rounded-full transition-transform hover:scale-110 focus-visible:ring-2 focus-visible:ring-offset-2 focus-visible:ring-[var(--color-text)]"
              style={{
                backgroundColor: swatch,
                boxShadow: color === swatch ? "0 0 0 2px var(--color-bg), 0 0 0 4px var(--color-text)" : undefined,
              }}
              aria-label={`Use ${swatch} accent color`}
            />
          ))}
        </div>
        <label className="mt-3 flex items-center justify-between text-xs" style={{ color: "var(--color-text-2)" }}>
          Custom color
          <input
            type="color"
            value={color}
            onChange={(event) => selectColor(event.target.value)}
            className="w-8 h-7 cursor-pointer rounded border-0 bg-transparent p-0"
            aria-label="Custom accent color"
          />
        </label>
      </PopoverPanel>
    </Popover>
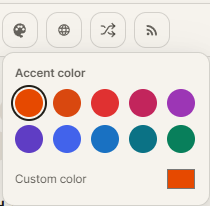
  )
결과 분석
- Full
- 컬러 피커 & CSS 변수 변경한다는 요구사항만 구현했다.
- Off
- Popover, 미리 정의된 색상 팔레트, LocalStorage 저장, 커스텀 색상 선택, Alpha 색상 등 추가 기능을 구현했다.
⇒ 실무에서는 기획 문서대로 개발해야 하니, AI의 상상이 가미되어서는 안된다. 따라서 ‘요구 사항만 구현’한 Full이 입맛에 맞았다.
테스트2 (Full vs Lite)
Prompt: 상단 nav 영역 RSS 왼쪽에, Random 문서로 이동하는 버튼 하나 만들어줘.
Full
소스 코드 보기
"use client"

export function RandomButton({ hrefs }: { hrefs: string[] }) {
  return (
    <button
      className="w-9 h-9 flex items-center justify-center rounded-xl transition-all duration-150 hover:bg-[var(--color-bg-2)] active:scale-95 disabled:opacity-50"
      style={{
        border: "1px solid var(--color-border)",
        color: "var(--color-text-2)",
      }}
      disabled={!hrefs.length}
      onClick={() => {
        **window.location.assign(hrefs[Math.floor(Math.random() * hrefs.length)])**
      }}
    >
      ?
    </button>
  )
}
Lite
소스 코드 보기
"use client"

import { useRouter } from "@/i18n/navigation"

export function RandomButton({ hrefs }: { hrefs: string[] }) {
  const router = useRouter()

  return (
    <button
      type="button"
      className="w-9 h-9 flex items-center justify-center rounded-xl transition-all duration-150 hover:bg-[var(--color-bg-2)] active:scale-95 disabled:opacity-50"
      style={{
        border: "1px solid var(--color-border)",
        color: "var(--color-text-2)",
      }}
      disabled={!hrefs.length}
      onClick={() => {
        **router.push(hrefs[Math.floor(Math.random() * hrefs.length)])**
      }}
      title="Random post"
      aria-label="Random post"
    >
      ?
    </button>
  )
}
결과 분석
- Full
- 페이지 이동에 window.location.assign() 사용했다
- Lite
- 페이지 이동에 useRouter() 사용했다
⇒ 이게 재미있는 결과였는데, Next에서는 useRouter()를 사용해야 필요 없는 부분까지 재렌더링되지 않는다.
실제 프로젝트 컨벤션도 useRouter() 이었다.
따라서 이 부분만 보면 Lite의 승이다.
테스트3 (Spring Framework, Lite vs Off)
Prompt: 프로젝트에 파일 업로드 기능 추가해줘. 파일 시스템에 저장하지 않고, 메모리에만 올려둘거야.
Lite
소스 코드 보기
@Service
public class InMemoryFileService {
    // ponytail: unbounded process memory; replace with object storage when uploads must survive restarts or grow.
    private final Map<String, StoredFile> files = new ConcurrentHashMap<>();

    public UploadedFileResponse store(MultipartFile file) {
        if (file == null || file.isEmpty()) {
            throw new ResponseStatusException(HttpStatus.BAD_REQUEST, "File must not be empty.");
        }

        try {
            String id = UUID.randomUUID().toString();
            String filename = file.getOriginalFilename();
            filename = filename == null || filename.isBlank() ? "file" : filename;
            StoredFile storedFile = new StoredFile(file.getBytes(), filename);
            files.put(id, storedFile);
            return new UploadedFileResponse(id, filename, storedFile.content().length);
        } catch (IOException e) {
            throw new ResponseStatusException(HttpStatus.BAD_REQUEST, "Could not read uploaded file.", e);
        }
    }

    public StoredFile get(String id) {
        StoredFile file = files.get(id);
        if (file == null) {
            throw new ResponseStatusException(HttpStatus.NOT_FOUND, "File not found.");
        }
        return file;
    }

    record StoredFile(byte[] content, String filename) {
    }
}
Off
소스 코드 보기
@Service
public class InMemoryFileStorageService {

    private final Map<UUID, StoredFile> files = new ConcurrentHashMap<>();

    public UploadedFileResponse store(MultipartFile file) {
        if (file.isEmpty()) {
            throw new BizException(FileErrorCode.FILE_EMPTY);
        }

        try {
            UUID id = UUID.randomUUID();
            String originalFilename = file.getOriginalFilename();
            String filename = (originalFilename == null || originalFilename.isBlank()) ? "file" : originalFilename;
            String contentType = file.getContentType();
            String safeContentType = contentType == null ? MediaType.APPLICATION_OCTET_STREAM_VALUE : contentType;
            byte[] content = file.getBytes();

            files.put(id, new StoredFile(filename, safeContentType, content));
            return new UploadedFileResponse(id, filename, safeContentType, content.length);
        } catch (IOException e) {
            throw new BizException(FileErrorCode.FILE_READ_FAILED);
        }
    }

    public StoredFile get(UUID id) {
        StoredFile storedFile = files.get(id);
        if (storedFile == null) {
            throw new BizException(FileErrorCode.FILE_NOT_FOUND);
        }
        return storedFile;
    }

    public record StoredFile(String originalFilename, String contentType, byte[] content) {
        public StoredFile {
            content = content.clone();
        }

        @Override
        public byte[] content() {
            return content.clone();
        }
    }
}
결과 분석
- Lite
- 최소한의 정보만 저장 & Spring 기본 예외(
ResponseStatusException) 사용한다.
- 최소한의 정보만 저장 & Spring 기본 예외(
- Off
- Content-Type도 함께 저장 & 기존 프로젝트 Exception 활용한다.
⇒ Off는 컨텍스트에 포함하지 않아도, 커스텀 ErrorCode를 구현해야 한다는 것을 감지하여 프로젝트에 Fit 하게 구현했으므로 Off가 잘 구현했다.
결론
- (1) ColorPicker 구현에서는, Full vs Off 에서는 요구사항만 구현한 결과가 만족 (Full)
- (2) 라우팅 버튼 구현에서는, next의 컨셉을 잘 따르는 구현이 만족 (Lite)
- (3) File 서비스 구현에서는, 기존 프로젝트 구조를 이해한 Off 구현이 만족 (Off)
Ponytail이 생각보다 안좋은 결과를 냈다.
프롬프트의 구체성 부족의 영향일 것 같은데.. 딱 시킨대로만 개발하기 때문에, 오답에 가까운 결과물을 내놓은 경우가 있었던 것 같다. (2, 3)
하네스나 Claude.md 등으로 Prompt를 더 구체화하면 유용하게 사용할 수 있지 않을까 생각된다.
Ponytail을 잘 쓰기 위해서는 프롬프트를 더 구체화하는 것이 필요할 것 같다.
(추가 기능) audit / review
Ponytail이 현재 프로젝트 / 커밋의 부풀려진 코드를 지적해준다.
/ponytail-audit   -- 프로젝트 소스 audit
/ponytail-review  -- 마지막 Commit Review
테스트
$ /ponytail-audit

stdlib: 사용처·매퍼 XML 없는 MyBatis 설정과 의존성 2개를 제거. JPA만 사용.
/D:/workspace/prettygoodorg/pluto-api/build.gradle:34,
/D:/workspace/prettygoodorg/pluto-api/src/main/resources/application.yml:16

delete: 주입·호출되지 않는 RestClient 빈과 전용 Apache HttpClient 의존성을 제거.
필요 시 Spring 기본 RestClient.builder() 사용.
/D:/workspace/prettygoodorg/pluto-api/src/main/java/com/prettygoodorg/pluto_api/common/config/RestClientConfig.java:14

delete: 비어 있는 UserCommandService 삭제. 대체물 없음.
/D:/workspace/prettygoodorg/pluto-api/src/main/java/com/prettygoodorg/pluto_api/api/user/service/UserCommandService.java:3

yagni: 구현체가 하나인 ErrorCode 인터페이스 제거하고 ErrorCodeImpl을 직접 사용. 다른 오류 코드 구현체가 생길 때만 복원. /D:/workspace/prettygoodorg/pluto-api/src/main/java/com/prettygoodorg/pluto_api/common/exception/ErrorCode.java:5

net: 약 -45줄, 직접 의존성 -3개 가능.
나는 요새 /ponytail-review를 통해, 커밋 직전에 불필요한 코드가 들어가지 않았는지 검증하는 용도로만 사용하고 있다.
Caveman

소개
Caveman은 AI가 답변할 때, 짧게, 원시인처럼 말하게 하는 플러그인이다.
why use many token when few do trick Make your AI coding agent talk like a caveman. Same answers, 65% fewer output tokens. Brain still big. Mouth small.
어떻게 동작?
추론에는 개입하지 않고 최종 답변에 개입하여, 짧게, 원시인처럼 말하게 한다.
레포에서 말하는 기대 효과는 두가지이다.
- 답변에서 사용하는 토큰 사용량을 줄인다.
- 핵심 내용만 생성하므로 사람이 글을 파악하는데 걸리는 시간을 줄일 수 있다.
테스트
Prompt: DB 설계중 반정규화를 선택해야 하는 경우를 알려줘
Off
반정규화는 읽기 성능·조회 단순성·집계 비용이 정규화로 얻는 데이터 일관성 이점보다 중요한 경우에 선택합니다.

  대표적인 경우:

  - 조회가 압도적으로 많고, 쓰기는 적을 때
    예: 상품 목록에서 매번 판매자 이름·평점·재고를 조인해야 하는 서비스.

  - 복잡한 조인이나 대용량 집계가 병목일 때
    예: 대시보드의 일별 매출, 사용자별 통계, 인기 상품 순위.
    원본 거래 테이블 대신 집계 테이블을 별도로 둡니다.

  - 응답 지연이 핵심 요구사항일 때
    예: 피드, 검색 결과, 실시간 랭킹, 주문 상세 화면.
    필요한 데이터를 미리 펼쳐 저장해 조회를 빠르게 만듭니다.

  - 과거 시점 값 보존이 필요할 때
    예: 주문 당시 상품명·가격·배송지. 상품이나 회원 정보가 이후 바뀌어도 주문 기록은 유지해야 합니다.
    이 경우 주문 테이블에 스냅샷 값을 저장하는 것이 적절합니다.

  - 분산 시스템·외부 데이터 의존성을 줄여야 할 때
    예: 사용자 프로필 일부를 주문 서비스에 복제해, 조회 때마다 회원 서비스 호출을 피하는 경우.

  단, 다음이 준비되어야 합니다.

  - 원본 데이터의 기준(source of truth)을 명확히 정하기
  - 중복 데이터 갱신 방식 결정: 트랜잭션, 이벤트, 배치, 캐시 무효화 등
  - 갱신 지연을 허용할지 정의하기
  - 불일치 탐지·재처리 방법 마련하기
  - 성능 측정 후 적용하기 — 인덱스와 쿼리 개선만으로 해결되면 반정규화가 불필요할 수 있습니다.

  요약하면: 자주 읽고, 조인·집계가 비싸며, 약간의 중복과 동기화 비용을 감당할 수 있을 때 반정규화를 고려합니다.
Full
 읽기 압도적 많고, 조인 비용이 병목일 때.

  - 대시보드·통계 화면: 집계값 미리 저장. 예: order_count, total_spent
  - 검색·목록 API: 자주 함께 읽는 필드 복제. 조인 감소
  - 대규모 테이블 조인: 인덱스 있어도 지연시간 목표 못 맞출 때
  - 이력 데이터: 당시 상품명·가격 등 스냅샷 보존 필요할 때
  - 분산 DB·캐시: 여러 저장소 조회 비용 클 때
  - 계산 비싼 값: 반복 계산 대신 materialized 값 저장

  선택 전 확인:

  - 읽기 성능 문제가 측정으로 확인됨
  - 복제 데이터 갱신 규칙 명확함
  - 불일치 허용 범위와 복구 방법 있음
  - 정규화·인덱스·캐시·쿼리 개선 먼저 검토함

  쓰기 많고 정확한 최신값 필수면, 반정규화 위험 큼.
Lite
• 반정규화 선택: 읽기 성능이 쓰기 비용보다 중요할 때.

  - 조회가 매우 많고, JOIN·집계가 병목일 때
  - 응답 지연 목표가 엄격할 때
  - 계산 결과를 반복 조회할 때: 주문 총액, 평점, 댓글 수
  - 분석·리포트용 데이터일 때
  - 데이터가 거의 안 바뀌거나, 변경을 비동기로 반영 가능할 때
  - 읽기 모델과 쓰기 모델을 분리할 때: CQRS, 캐시, materialized view

  예: posts.comment_count 저장. 댓글마다 COUNT(*) 하지 않아도 됨.

  주의: 원본 데이터는 정규화해 유지하고, 중복 필드는 파생값으로 취급. 갱신 책임·트랜잭션·재집계 방법 없으면 데이터 불일
  치 생김.
3달 사용 후기
- 안 썼을 땐, 출력이 너무 길어서 핵심 파악하는데 짜증이 났었다.
- Full은 너무 단답형이라, 새로 알게되는 개념에 대해서는 글이 잘 안읽히는 경우가 있었다.
- 개인적으로 Lite 답변 퀄리티가 적절해 보여, 이거 사용중이다.
사족
Caveman 실측 시, 오히려 토큰 사용량이 늘어난다는 벤치마크가 있다.
Does Caveman Actually Save Tokens? I Built a Benchmark to Find Out
- 스킬 로드로 인해, Caveman 자체를 활성화하는 순간부터 초기 Context가 증가한다.
- 짧은 세션에서는 초기 오버헤드가 커서 Caveman을 쓰는 이득이 거의 없을 수 있다
요약하면, 토큰 사용량은 큰 의미 없고 (오히려 늘 수 있음) 짧은 답변을 통해, 핵심 파악에 걸리는 인지 시간 절감을 장점으로 보면 되겠다.